This article is written for people who are interested in creating a blog on their own but have minimal coding experience. It focuses on using Hugo and GitHub as the main tools for creating a blog. Hugo offers hundreds of themes with diverse styles and functions that you can explore to suit your personal needs. I would recommend the Blowfish theme, which is one of the most advanced and flexible themes in Hugo with attractive layout and detailed documentation. If you prefer to use a different theme, simply refer to the documentation of your chosen theme when it comes to theme-specific steps.
Prerequisites #
No prior background knowledge is needed. I will try to explain everything in the procedures and feel free to leave a comment if you have any questions during the setup.
However, to ensure a smooth follow-along experience, please complete the following steps before getting started:
- Sign up for a
GitHub Account and generate a personal access token following this
tutorial
Copy the token and store it somewhere else, because you won’t be able to see it again on GitHub.
- Download a code editor if you don’t have one
- Visual Studio Code, recommended for individuals with long-term coding needs
- Sublime Text, recommended for beginners
- Install
Git on your system
- You can check whether Git is already installed by running
git --versionin the terminal - If you’re a Mac user, please install homebrew first, which will make your life much easier
- You can check whether Git is already installed by running

For coding newbies, the installation steps are essentially copying and pasting commands into the terminal. You can find the macOS Terminal in the Utilities folder within the Applications folder, or simply search for it using Spotlight; Windows user please use PowerShell.
That’s it! You’re ready to start now.
Procedures #
1. Install Hugo #
for MacOS
- Run this command in the terminal. This will install the extended edition of Hugo.
brew install hugo
- Enter this command in the terminal to verify whether Hugo is installed successfully.
hugo version
for Windows
- Refer to Hugo Installation Instructions or this tutorial on Windows 10
2. Create a Hugo Site #
- Run the
cdcommand to navigate to the folder where you’d like to store the code for the blog. For example, if you want to place the folder on yourDesktop, the command should be:
cd ~/Desktop
cdmeans “change directory”, which will allow the terminal to change its current working directory to another location in the file system.~refers to the home directory on your system. It can be omitted if you’re already in the home directory.
If you want to place your folder in a different location, you will need to modify the code with the actual path. Learn more about the command line here for your reference.
- Run this command with your own site name to create the necessary directory structure for your website. For example, the exact command I used is
hugo new site gigigatgat.
hugo new site <your-site-name>
- You should see a folder with the name
<your-site-name>on your desktop or your selected location. The folder should include eight subfolders and one configuration file:
├─ archetypes
├─ assets
├─ content
├─ data
├─ hugo.toml
├─ i18n
├─ layouts
├─ static
├─ themes
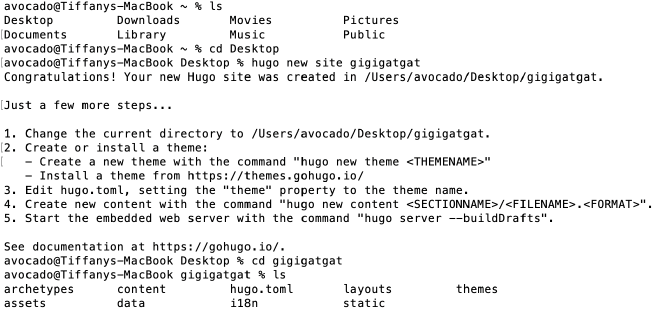
lsmeans “list”, which will display the contents of a directory.
3. Download and Configure the Blowfish Theme #
Download the Blowfish theme #
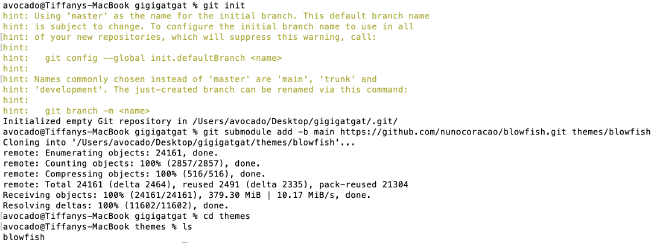
- Run the following commands one by one. Make sure you replace
<your-site-name>with the actual folder name.
cd <your-site-name>
git init
git submodule add -b main https://github.com/nunocoracao/blowfish.git themes/blowfish
- Check the
themesfolder in this project. The Blowfish theme should be cloned in this folder.
Set up the basic configuration files #
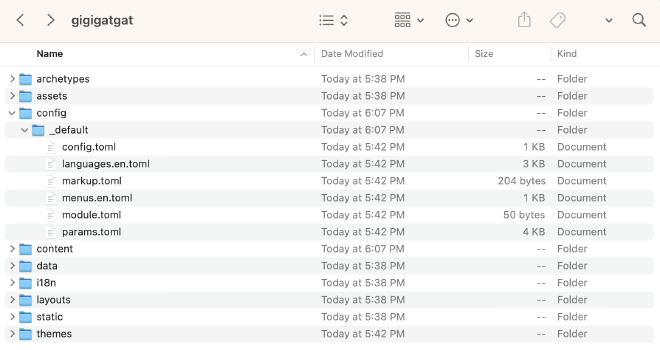
- In the root folder of your website project, delete the initial
hugo.tomlfile. - Copy all the config files from the
themes/blowfish/config/_default/folder to theconfig/_default/folder in your root folder. - After the previous steps, your folder should look as follows:
4. Dive into the Blowfish Theme #
I strongly recommend that you go through the official Blowfish Documentation Series to develop a comprehensive understanding towards the various parameters of the files and functionalities of the theme. This section serves as a quick start for a basic blog and provides some additional explanations based on the documentation.
In the theme files, you’ll see the # character frequently which is used to denote comments. Removing the # character will activate the line of code.
Modify the configuration files #
# config.toml #
Set the parameters as below and note that:
- Update the baseURL as
https://<github_username>.github.io/<repository-name>. You’ll set up the repository in GitHub later. My baseURL in this case ishttps://avocadoTiff.github.io/gigigatgat. - You may want to change the
defaultContentLanguageto “zh-CN” for simplified Chinese or “zh-tw” for traditional Chinese. Other available languages could be found here.
# config/_default/config.toml

theme = "blowfish"
baseURL = "https://<github_username>.github.io/<repository-name>"
defaultContentLanguage = "en"
# languages.en.toml #
If your website language is English, you can just modify the following parts of the file:
# config/_default/languages.en.toml
title = "<your-site-name>"

[author]
name = "your name"
image = "img/blowfish_logo.png"
headline = "I'm only human"
bio = "A little bit about me"
links = [
  { email = "mailto:hello@your_domain.com" },
  { instagram = "https://instagram.com/username" },
  { mastodon = "https://mastodon.instance/@username" }
]
If the defaultContentLanguage you set in the config.toml file is “zh-CN”, you should rename this file as languages.zh-CN.toml and update the code as below:
# config/_default/languages.zh-CN.toml

languageCode = "zh-CN"
languageName = "Chinese"
weight = 1
title = "<your-site-name>"

[params]
  displayName = "中文"
  isoCode = "zh-CN"
  rtl = false
  dateFormat = "2 January 2006"
  # logo = "img/logo.png"

[author]
name = "Your name"
image = "img/blowfish_logo.png"
headline = "I'm only human"
bio = "A little bit about me"
links = [
  { email = "mailto:hello@your_domain.com" },
  { instagram = "https://instagram.com/username" },
  { mastodon = "https://mastodon.instance/@username" }
]
- The images should be placed in the site’s
assets/img/folder. - In the
[params]sectiondisplayNamewill only be displayed when the language switch function is usedlogorepresents the site’s logo
- In the
[author]sectionimageis your profile imageheadlinewill be displayed on the homepagebiowill be displayed in the articles if you setshowAuthor = truein theparams.tomllinksare the social media icons with links that you’d like to share
links, the correct syntax is: links = [{item1}, {item2}, {item3}]. Avoid omitting any punctuation or adding an extra comma after the last item.
# menus.en.toml #
Refer to the code below for basic menu settings:
# config/_default/menus.en.toml

 [[main]]
  name = "Posts"
  pageRef = "posts"
  weight = 10

[[main]]
  name = "Tech"
  parent = "Posts"
  pageRef = "categories/tech"
  weight = 20

[[main]]
  name = "Kitchen"
  parent = "Posts"
  pageRef = "categories/kitchen"
  weight = 30

[[main]]
  name = "About"
  pageRef = "about"
  weight = 70

[[main]]
  identifier = "github"
  pre = "github"
  url = "your-url-link"
  weight = 100

 [[footer]]
   name = "Tags"
   pageRef = "tags"
   weight = 10

 [[footer]]
   name = "Categories"
   pageRef = "categories"
   weight = 20
namespecifies the text will be displayed in the menu link.pageRefspecifies where the Hugo page would be directed to. You need to have corresponding pages in thecontentfolder to be linked to.parentis used for nested menus.identifierandpreare used to place icons in the menu.urlis for linking to external URLs.weightis used to sort the menu links in ascending order. The lowest weight will be displayed as the first item in the menu.
Similar with above, rename the file as menus.zh-CN.toml if simplified Chinese is your site’s defaultContentLanguage.
# params.toml #
This file specifies a wide range of theme parameters that you can use to customize your site. To ensure a smooth start, I suggest you modify the following lines in the file:
# config/_default/params.toml

mainSections = ["posts"]
disableImageOptimization = false

defaultBackgroundImage = "/img/ocean.jpg"
defaultFeaturedImage = "/img/ocean.jpg"

highlightCurrentMenuArea = true
smartTOC = true
smartTOCHideUnfocusedChildren = false

[header]
  layout = "fixed" # valid options: basic, fixed, fixed-fill, fixed-fill-blur

[homepage]
  layout = "background" # valid options: page, profile, hero, card, background, custom
  # homepageImage = "/img/ocean.jpg" # used in: hero, and card
  showRecent = true
  showRecentItems = 10
  showMoreLink = false
  showMoreLinkDest = "posts"
  cardView = false
  cardViewScreenWidth = false
  layoutBackgroundBlur = true # only used when layout equals background

[article]
  showTableOfContents = true
  showTaxonomies = true
- Again, the images should be placed in the site’s
assets/img/folder. For now you can copy all the files from thethemes/blowfish/exampleSite/assets/folder to theassetsfolder in your root folder for convenience. mainSectionsis related to the content you’d like to display in theRecentarticles on the homepage.- Refer to the Blowfish Configuration article for more details and experiment with the rest parameters later.
Add pages to your site #
- Content Organization #
All content is placed within the content folder. Below is an example of the content structure based on the above menu:
.
├── assets
│   └── img
│       └── ocean.jpg
|       └── logo.png
├── config
│   └── _default
├── content
│   ├── _index.md
│   ├── about.md
│   ├── categories
│   │   ├── _index.md
│   │   ├── tech
│   │   │   └── _index.md
│   │   └── kithen
│   │       └── _index.md
│   ├── tags
│   │   └── _index.md
│   └── posts
│       ├── _index.md
│       └── first-post
│           ├── featured.jpg
│           └── index.md
└── themes
    └── blowfish
- Add Content #
There are two ways to add content in the site project: you can either use the GUI (Graphical User Interface) or the CLI (Command Line Interface).
- GUI: Simply create new folders, copy and paste files, edit them in your code editor. The example files can be found at
themes/blowfish/exampleSite/content/folder.
- CLI: Copy
default.mdfromthemes/blowfish/exampleSite/archetypes/folder to replace the initial one in thearchetypesfolder in your root directory. Use the terminal to run this Hugo command to create a new page:
hugo new content posts/my-first-post/index.md
This command will create an index.md file in the content/posts/my-first-post folder based on the front matter template defined in the archetypes folder. If you open the file in your code editor, it will now look like this:
---
title: "Index"
date: 2023-11-02T16:21:18-04:00
draft: true
---
- Branch pages #
Branch pages include the
homepage,
section listings, and
taxonomy pages. The filename for this content type is _index.md. As you can see in the above content structure, the content/_index.md file defines the content of the homepage, and the content/posts/_index.md file defines the content of the posts page. In
this example, I only specified the title, description, and whether the posts list on this page would be grouped by year:
---
title: "Posts"
description: "All posts"
groupByYear: true
---
- Leaf pages #
Leaf pages are single pages that don’t contain a list of sub-pages. It is named as index.md in the corresponding post folder for an individual article page or about.md for an about page. My index.md file in the content/posts/Getting Started with Entity Framework Core in Visual Studio folder looks like this:
---
title: "Getting Started with Entity Framework Core in Visual Studio"
date: 2023-10-24
draft: false
description: "How to use Entity Framework Core to connect database in Visual Studio"
slug: "how to use Entity Framework Core"
tags: ["tutorial", "code", "ASP.NET", "VisualStudio"]
categories: ["Tech"]
---

Entity Framework Core is a powerful tool for simplifying database integration with web applications...
draftdetermines whether this content is ready to be published or not. If it is set totrue, the content will not be visible when you build the site.slugis used in the URL path when the content is published. In my case, the link for this post would behttps://tiffahahahu7.github.io/gigigatgat/posts/how-to-use-entity-framework-core/.tagsandcategoriesare defined here to be displayed on theTagsandCategoriespages.- The body of the post is written in markdown, an easy-to-use text formatting language. I strongly recommend familiarizing yourself with it.
For more explanations, you can refer to Blowfish’s Content Examples and Front Matter.
5. Preview and Publish #
- Run this command in the terminal to preview the site in your browser, with the given URL address
http://localhost:1313/orhttp://localhost:1313/<repository-name>depending on your baseURL.
hugo server
draft value for the pages you want to display is set to false; otherwise, they won’t appear in the browser, unless you run hugo server -D.
If you site doesn’t render your posts correctly, double-check the rules for content organization.
- Modify the content and configuration until you’re satisfied with the preview.
TagsandCategoriesmay not be updated immediately. In this case, try to exit by pressingCtrl + Cand restarthugo serverto see the changes. - In the root directory, run the following command to publish the site. It will create a
publicfolder with the entire static files necessary for your website.
hugo
6. How to Deploy the Site with GitHub Pages #
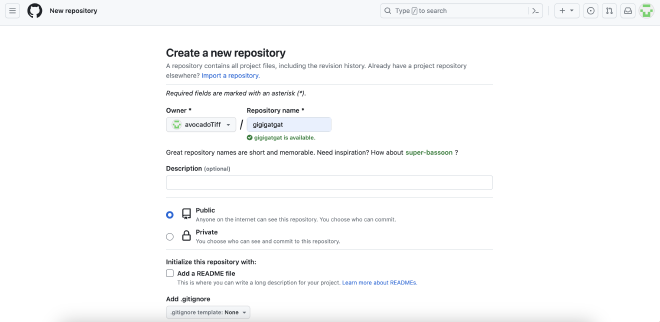
- Go to your GitHub Account and create a new repository. The repository name should be in accordance with your baseURL in the
config.tomlfile.
- Run the following commands to add the GitHub repository as a remote repository and push all the local files to it. Remember to replace with your own remote URL.
git init
git add .
git commit -m "first commit"
git branch -M main
git remote add origin https://github.com/avocadoTiff/gigigatgat.git
git push -u origin main
- Change your directory into
public. Run the following commands to connect to the remote repository and create agh-pagesbranch
cd public
git init
git remote add origin https://github.com/avocadoTiff/gigigatgat.git
git checkout --orphan gh-pages
- Run the following commands to upload the files to
gh-pagesbranch
git add .
git commit -m "upload site files"
git push -u origin gh-pages
- In the
Settings > Pages, ensure that the GitHub Pages site is being built from thegh-pagesbranch
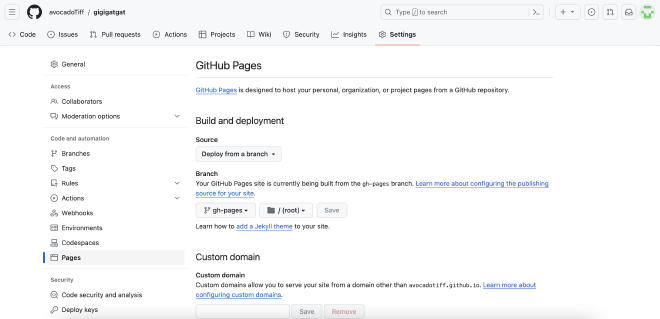
- Wait for a few minutes and refresh the page. You’ll see a message like this:
Your site is live at https://avocadotiff.github.io/gigigatgat/.
🎉 Congrats! Your blog is now live online!
7. How to Update Your Blog #
Once you make any modification or add new posts to your blog, you can update your blog by three steps:
- In the root directory, review you site preview by executing the command
hugo serverand then run the commandhugoto update the site files in thepublicfolder. - Ensure that you’re still in the in the root directory and run the following commands:
git add .
git commit -m "add new posts"
git push -u origin main
- Change your directory into
publicby the commandcd publicand run the following commands:
git add .
git commit -m "add new posts"
git push -u origin gh-pages
This is the most basic way of updating your blog manually. You can also automate the deployment process with GitHub Actions, which is a more advanced and efficient method. I’m still in the process of learning GitHub Actions, and I’ll keep you updated if I come across an easier way to comprehend and make use of this tool.
Thank you for reading this far! I hope this tutorial can help you in building your personal blog smoothly. If you have any questions during the process, please feel free to reach out. I’m more than happy to help create another blog in the universe.
